Zinc Plating at Home with Common Materials
by Tom Gugliotta
Introduction
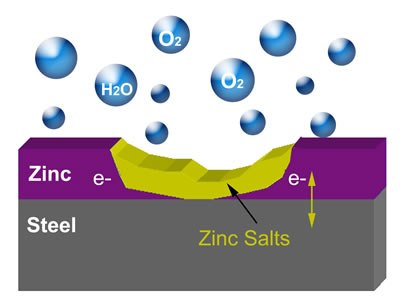
As you work on your collector car, you will come across many parts that are, or once were, zinc plated. This includes many irreplaceable screws, bolts, washers, and other pieces of hardware specific to your vehicle that require rust protection. Steel parts are zinc plated simply to protect them from corrosion and are considered "sacrificial coatings". Often, the zinc-plated parts are identified by the presence of “white rust” or zinc salts formed by the sacrificial oxidation of the zinc. The rusting of iron is an electrochemical process that begins with the transfer of electrons from iron to oxygen. By providing electrons to the iron or steel from zinc, oxidation is prevented. The diagram below shows cathodic protection of the steel by the zinc.
As I came across a number of small parts that were zinc plated on my 1962 Ford Thunderbird, I wondered how I could renew the zinc plating before reassembling the parts. An Internet search led me to several commercial kits that included proprietary solutions and some basic materials to get you started with zinc plating. However, I found them to be costly for what you get and the replacement chemicals very expensive. Since I have a background in chemistry, I decided to develop a process that can be done with easily obtained materials. Zinc plating is not toxic or dangerous and it is a common science fair and middle and high school chemistry demonstration. It will require some initial investment in materials, but once you have everything gathered, the electrolyte solution can be made for several dollars per run.
Safety
Before proceeding, always observe proper safety practices. Always wear nitrile or rubber gloves. This not only protects your hands, but also keeps oils off the work piece that will affect the quality of your plating. Wear appropriate safety gear and observe prudent environmental practices. Check your local laws regarding zinc disposal. In my city, it can be dumped down the drain. Work in a bright, well ventilated area. This is messy so do not do it in your kitchen!
The Chemistry
Because I found so much confusing information on the Internet and bad videos on YouTube, I decided to write up this summary to help with the understanding of what is going on during electroplating. Electroplating occurs in an electrolytic cell. First, the cell consists of an electrolyte, which is a substance containing free ions which are the carriers of electric current. For this demonstration, Epsom salts, or magnesium sulfate (Mg2SO4) and vinegar, or acetic acid will be used as the electrolyte. The next part is the anode. The anode is connected to the positive side of the power source. It attracts negatively charged ions or anions. Oxidation occurs at the anode. Next is the cathode. This is connected to the negative side of the power source. It attracts the positively charged cations and moves anions away from it toward the anode. It provides electrons to the cations to convert them back to the parent metal, a process called reduction. The piece providing the metal (zinc) is the anode and the part on which the metal is deposited is the cathode. The diagram below shows an electrolytic cell. The reaction at the anode is that for each two electrons that the power source removes, one atom of zinc goes into solution according to the reaction Zn0 - 2e => Zn++. These Zn++ ions migrate toward the cathode where the two electrons are picked up again, causing the reaction Zn++ +2e => Zn0.
Materials needed:
- Postal scale and plastic containers for weighing, such as cottage cheese containers.
- Measuring cups large enough to measure quarts or liters. I use a 1-quart and 1-cup Pyrex measuring cups.
- Epsom salts. I obtained this from the grocery store in the pharmacy section for $2.99 for 4lbs.
- Zinc sulfate. This one item is not readily available at a store. Purchase this from Ebay for about $20 for two pounds, including shipping. I discovered this reduced the time and increased the quality of the plating. This provides zinc ions to the electrolyte so that you do not have to wait for the zinc anodes to “plate out”.
- Karo brand corn syrup. This contains glucose and is added to the solution as a brightener in what is called ligand or coordination chemistry. It keeps the zinc crystals in alignment and prevents them from growing too large as they are deposited. Be sure to use Karo brand as store brands contain high fructose corn syrup. Just check the label.
- 1 gallon of white vinegar, about $2.50/gallon at the grocery store.
- 1 gallon of muriatic (hydrochloric) acid. This is available at a home improvement store for about $6.
- A short piece of ½ inch copper pipe to cut and use as a hanger across your bucket.
- 14AWG solid household wire to hang your part in the electrolyte, two feet is sufficient.
- 22AWG solid wire for smaller parts. This is available from Radio Shack.
- Various buckets for electroplating (preferably white) and rinsing. I use a dish soap bucket that holds about 5 liters as my electroplating bucket and 4-liter buckets purchased from the dollar store for rinsing.
- Zinc anodes. In this part of the country, they are a seasonal item found at Home Depot and Lowe’s and are used to prevent rust in evaporative coolers (more commonly known as "swamp coolers"). I could not have found a more perfect electrode as it already has an electrical lead attached to it via a copper wire that runs down the core of it. If you cannot find them locally, you can purchase them from Home Depot from their website. You can also use anodes found in boating stores and on Ebay, but this is the easiest. I cut off the factory lugs and joined them together with one lug. They cost about $8.50 each.
- Several DC power supplies. I use a 6V 1A power supply from an old network router I had laying around, as well as a 5V 300mA power supply from an old rechargeable tool. The voltage does not matter; you are only concerned with the current output. I discovered a battery charger provides too much current for small parts.
- 1 quart or gallon of denatured alcohol for various rinsing. After media blasting your parts, you can store them in the denatured alcohol to prevent flash rusting.
- Other items you will need will be nitrile gloves, two long clip leads, a brass wire brush, white toothpaste such as Ultrabright, #0000 steel wool, and a small block of wood.
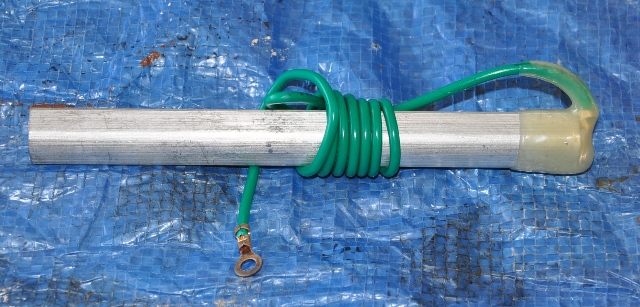
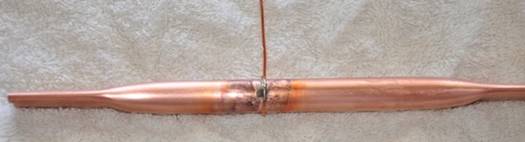
This is a zinc anode designed for an evaporative cooler.

Make a hanger by cutting and crimping the end of a ½” copper pipe to match your bucket. Solder a piece of 14AWG copper wire to the hanger to make a sturdy hook. For smaller parts such as ¼” bolts, use 22AWG solid wire draped over the hanger.
The Process
Mix together 300 grams of Epsom salts, 100 grams of zinc sulfate, 200ml of white vinegar and about 1/3 bottle of corn syrup into 4.5 liters of tap water and stir with a paint stick until everything is well dissolved. Place the anodes into the solution. The resulting pH is about 3 as determined by litmus paper. As I learned from a plating book, 140mA per sq. inch is the recommended amount of current for zinc plating. Measure the approximate surface area of your part and choose your power supply accordingly.

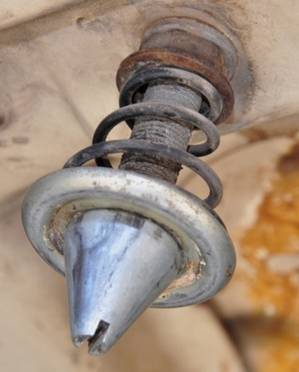
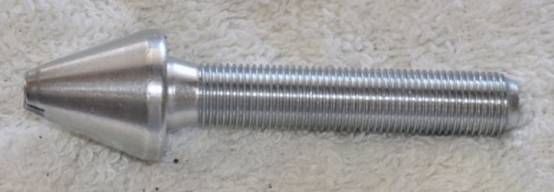
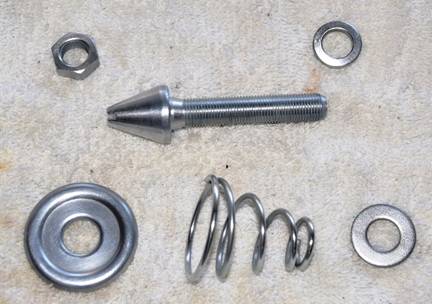
For this demonstration, I will re-plate this hood latch pin assembly from my Thunderbird.
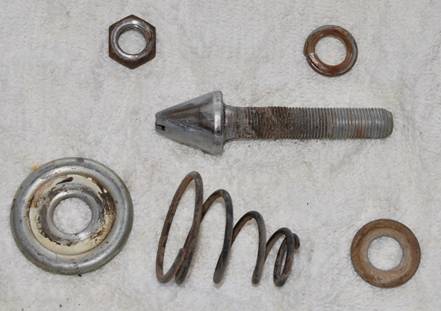
Here is the disassembled pin. I will focus on the large washer for now, as it is a simple part to plate, and show an additional step for the pin. Note the yellow on the inside of the washer. This is a chromate conversion coating, which is yet an additional, yet poor, layer of protection. Car buffs often mistake this as cadmium plating. While there might be some cadmium plated parts in your car, most likely it has a chromate conversion coating on it also.
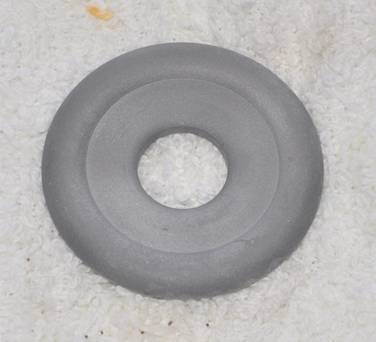
This is the washer after media blasting. Rinse it in denatured alcohol before plating.
Place the washer on the hanger and place it into the electrolyte. I chose my smaller 300mA power supply for the washer. I discovered that it is better to use less current and more time to avoid burned spots on the part. Connect the positive line of the power supply to the zinc anodes and connect the negative line to the copper pipe or wire using clip leads. You may not see anything happen at first; however, the part should start bubbling moderately within a minute.

Here is a view of the plating tank assembly. Here I am using four anodes. Two should be sufficient for most simple parts. Be careful not to short positive to negative.
It will not hurt anything to check on the part now and then. You may wish to rotate it for even coverage, but be patient. When it is completely covered in a nice blue-gray color, rinse the part well in water. The washer took about 10 minutes.
Using a brass wire brush, some toothpaste, and water on a block of wood, gently brush the part to remove the excess material from the washer, followed by some polishing with #0000 steel wool and toothpaste.
The washer should be bright and well covered.
Rinse it again in denatured alcohol, plate it again until it appears blue-gray, and repeat the cleaning process. I have found that “striking” the part two to three times gives excellent results.
Stripping Zinc from Heavily Plated Parts
Zinc is a rather hard metal and if the part you are working with still has a lot of its original plating on it, it may be rather hard to media blast off the old zinc. This was the case with the pin. In this situation, the zinc can easily be removed with a dip in a solution of hydrochloric acid. To prepare the bath, fill a bucket with about 3 liters of water. Add about 200ml of muriatic (hydrochloric, HCl) acid to the water. Always add acid to water, never the other way around. Adding water to acid generates tremendous heat and could cause spattering that could splash acid on you. Wear goggles and gloves when handling hydrochloric acid. The acid mixture can be disposed of down the drain with copious rinsing.
Here I have wrapped a piece of 22AWG copper wire around the pin and dipped in the HCl. It will bubble very vigorously at first then slow down as the zinc is depleted as shown here:
Here is the pin after rinsing it well in water. All of the zinc is now stripped off and is ready for media blasting:
This is the pin after blasting:
I wrapped 22AWG wire around the pin until it was balanced well and hung it over the pipe. I chose my 1A power supply for the pin. Not shown here, but you may want to connect your negative clip lead directly to the wire for better conductivity.
As with the washer, I pulled the pin out after it had a nice blue-gray coating. Brush and polish the pin and strike it several times, as you may get some plating “shadows” from the copper wire. Here is the finished pin:
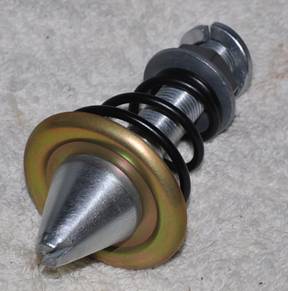
This is the entire assembly zinc plated. The spring was not originally zinc plated, but painted black over steel. I went ahead and plated it to give it to give it an added degree of protection before re-painting. I spent about four hours cleaning, blasting, plating, and taking pictures, to plate these parts. With some practice, you can plate more than one part at a time to speed up the process.
Here is the final assembly. I have given the washer a chromate conversion coating with a sodium dichromate solution, as it was originally. I will discuss that process in a future article.
Conclusion
I discovered that this is very much art as well as science. You will need a fair degree of patience, as it is rather time consuming; however, the results are very rewarding and you will save a lot of money in the long run. I did most of my practice runs with a 1”x1/8” piece of bar stock cut into one inch lengths with a hole drilled at one end for the hanger. Of course, you can also practice with old bolts and washers too. I hope I have explained the details enough so that the process is reproducible by anyone. If you have questions, you can contact me by email at rt66tbird@gmail.com.